Showing posts with label North Shore Line. Show all posts

Wednesday, 6 June 2012

CNS&M 459: Part 5

Well after about an hour and a quarters work I got this part back into shape.


I was recently asked how do I hold all the bits together to stop them falling apart. The simple answer is to use a jig. In this case a very simple jig that uses dress pins stuck into the board I solder on to hold everything in place. To get the coupler plate in the right place I used a coffee stirrer to keep the distance I wanted between the front solebar and the coupler plate.


As you can see here bits have fallen off. Do not panic, bits will fall off. Just take your time and re-solder them back-on later with spot solder joints. Unfortunately, one of the little stanchions that holds the cut lever in place pinged off never to be seen again. Drat. Also broke one of the grab irons, but as that is a simple piece of bent wire, it's not hard to replace.


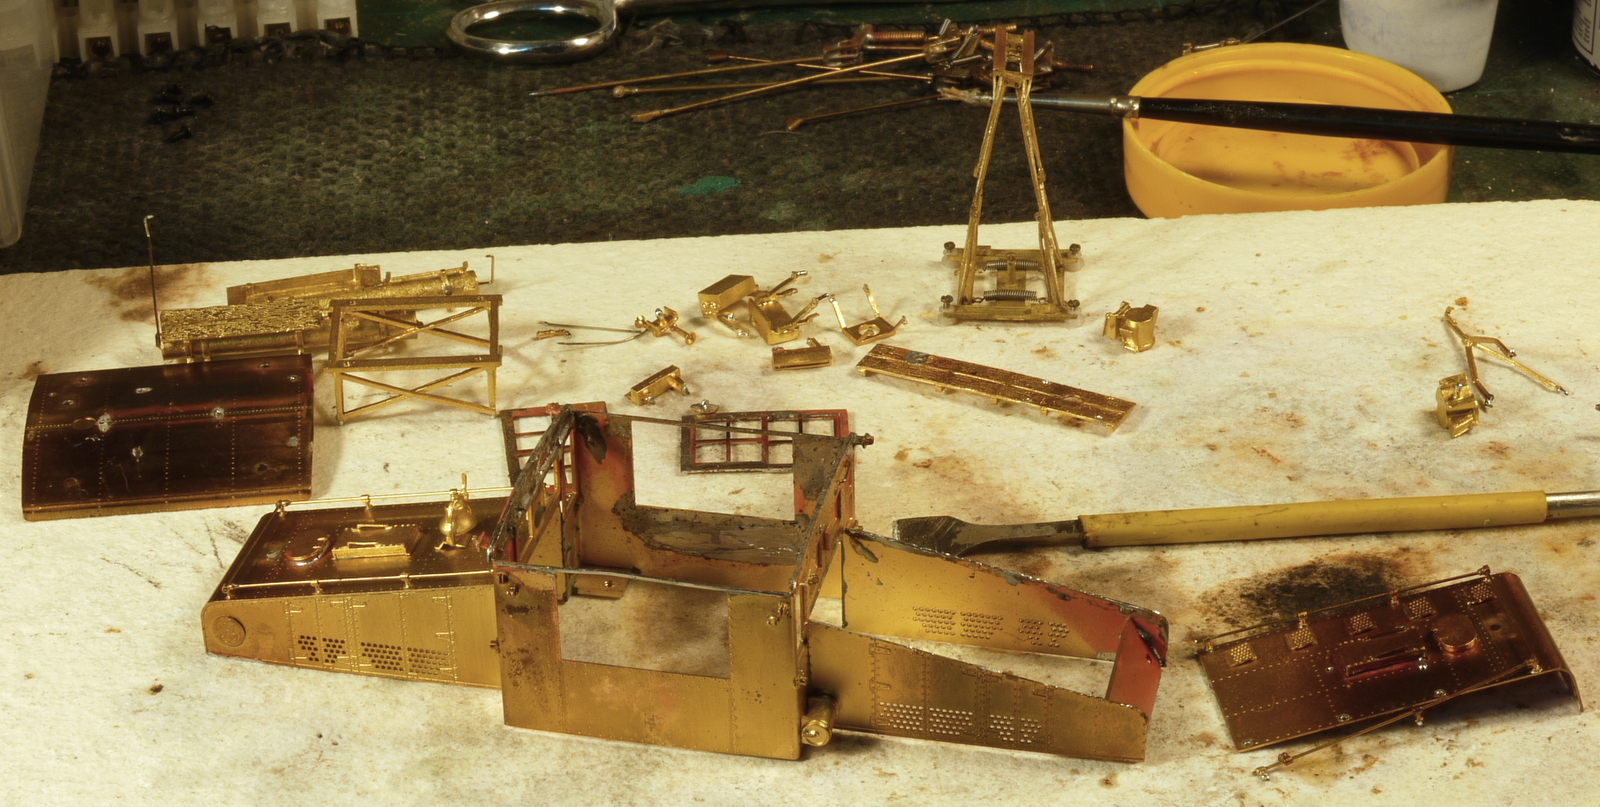
Meanwhile, I ran the all the rest of the finished parts through the paint shop. Here is the main body painted red, and I will now mask the nose, window frames, and doors and paint her green.


Et voilĂ ...

Of course I've still to finish off the other frame assembly and paint it. So a bit of a half-finished botch up really, but I was on a roll.


So now to fabricating a replacement for the missing stanchion that holds the cut lever assembly on the front of the frame. There are three of these, so I'm going to use one of the remaining two as a template. First I soldered the spare on to a piece of scrap brass that was the right thickness, cleaned it up a bit, and then drilled the hole through.

Next I cut around it to get the rough shape, but leaving enough to hold the work with.


Okay, all I've got to do now is clean off the excess solder, reassemble the cut lever assembly onto the sub-frame and this part of the project is done & dusted.

I have to be honest, and admit that on Monday I had lost my Mojo over this. I spent most of the day distracting myself with other stuff, like going out for a meal and seeing the new Ridley Scot movie Prometheus, which was a welcome change. On Tuesday I was able to get back in the saddle and work on both this locomotive and #452. The point is, that patience and perseverance are what you need when doing something like this, and if you have enough of both then you can achieve whatever you set your mind to.

Monday, 4 June 2012

CNS&M 452: Part 1


I realised that I haven't really posted anything about my one, mostly, stalwart performer on the layout, locomotive #452. I say mostly stalwart because I did have some initial problems with her after putting a chip in. Not that the chip cause any difficulties, but the model just stopped being able to pull cars.

I looked and found that only one power truck was actually working, and the other was just dragging on the whole locomotive. So I took the model apart and found that the universal joint on the gear train was rotating freely on the shaft. Pretty much a definition of not a good thing as you'll ever find in model railroading.

I ended up having to disassemble the whole motor drive train to be able to fix this problem, and noted that the universal joint had been jimmied to fit during assembly at some point prior to me buying the model, which I think was the reason it failed.

However, after re-powering locomotive #454, I thought why not go back and sort out the drive train on #452 the same way, and sort out the ride height at the same time. How hard can it be the second time round?

So here she is all disassembled and showing the old motor with the new replacement Mashima 1424 for size comparison. I stole the flywheels, with their built in universal joints, off #457, which has fast become the locomotive that one steals bits off to get the others running. Very "real world" operating department'ish.

Unlike my other two steeplecabs this model comes from The Car Works, and is wired to pick up with live wheels on one side of each bogie. So I am going to have to insulate the motor from the chassis.

Friday, 1 June 2012

CNS&M 459: Part 4

And the saga continues.


First off remove the cow-catcher and the coupler mounting plate. As you can see I've cut a couple of small brass pieces to act as an extra shim to raise the cow-catcher casting off from the floor.


And here it is all soldered back together after a quick clean in the ultrasonic cleaner and quick brush over with a fiber glass brush. Unfortunately, when I assembled said sub assembly together the mounting post fouled the gear box. So I had to sit and ponder the clearances, which were pretty tight, but I reckoned I could find a good compromise position for the post.


So here are both frames altered and both have been washed and put in the ultrasonic cleaner for good measure. The right hand assembly is still awaiting a for a good go over with the fiber glass brush to sparkle it up. I'm starting to think at this point that I might as well run the whole locomotive through the paint shop while I'm at.

Tuesday, 29 May 2012

CNS&M 454: Part 2

I went to to Railex on Saturday and had a good time browsing the show, looking at the layouts and buying some Mashima motors. Pretty much the whole of the CLAG gang were there, what with Trevor, Susan, Bill, Russell, James (now editor of the Scalefour News), and myself being in attendance. It's just a pity Ted and Prem couldn't make it. We were also noticed, being labelled as the London Group by one friendly trader (High Level Kits).

It seems that the motor that I put into #454 was a 1628 round can, and today you can get smaller motors from Mashima, so I bought a pair of 1424s, one 1426, and a 1015, which I believe is the smallest Mashima make. The former have 2mm shafts, while the later has a 1.5mm shaft. I also bought some flywheels too.


Here is a comparison shot of the original Canon motor in #454, the round can I posted about, and then the new Mashima's. I intend to use the smallest in locomotive #450, to replace the massive old Pittman that is in it.

So now all I have to do is replace the round can motor in #454 with a flat can, as this will lower the drive shafts in line with the gear towers. And while I'm at it I shall rework #452s drive train as well.


As you can see above, the ball bearing make the tube for the drive shafts really floppy, as both of mine have drooped here.

Friday, 25 May 2012

CNS&M 459: Part 3

Well once I got the soldering iron out all bets were off on getting this job done and dusted quickly.


I took off the casting by wafting a micro blow torch across the joints, because my soldering iron doesn't have the thermal capacity to cope with large conductive surfaces. I added a shim to the floor so that the casting bracket would not be floating at an uncontrolled height from the floor when I re-soldered them back on.

I also chose to file the cow-catcher where the bottom Kadee box would fit, but even in spite of doing this, I ended up having to cut off part of the lid on the box, so that the coupler would fit as you see above.

All back together and a comparison between before and after modification to get the Kadee coupler box to fit.


And here is a side view showing how much lower the cow-catcher is. Unfortunately the coupler is drooping, which I suspect is down to the missing lid.


However, the height is in the right ball park when the assembly is checked against a height gauge.

Uhm... not totally 100 percent happy with this. So for the next one I'm going to increase the shim thickness so as to lower the cow-catcher casting a little more, as it appears I will have enough clearance for it not to short on the track.

Wednesday, 23 May 2012

CNS&M 459: Part 2


Well I thought to myself if I'm chipping engine #454, why don't I chip #459 while I'm at it? After all how hard can it be? (Note to self: perhaps I should rename the blog "How Hard Can it Be?")


So here she is chipped and ready to roll. And she ran okay too. How about that for something that for once really was just a straight forward job?

However, I forgot to mention the coupler problem. What coupler problem do you mean, I hear you ask? Surely the mounting pad on the frame is the correct height to mount a Kadee on? It sure is the correct height, but the space between the top of the cow catcher and the bottom of frame is too small to fit a coupler box in the space in between. Furthermore, even if one remove said cow catcher the coupler box will hang out front like a cushion draft gear that you see on some freight cars.

Not good.

Also, there was the small matter of the loose handrails, which I had temporarily super glued back into position. What can I say? I'm a slacker for avoiding soldering whenever I can. Again, how hard can it be to take the locomotive apart and sort out the couplers?


Well by the time I had managed to get the sub-frame apart I had completely disassembled the model. Along with said handrails, and in the process found that all the apparently solid ones were worse for wear too.


So I think while I'm here I might as well put this baby in the ultrasonic cleaner, as one does, to remove dirt, grease and other residues. Took the parts out and there was a nasty white residue coating everything. I'm going to assume that this was the lacquer sprayed on the model when it was made. In addition a couple of foot steps came off in the ultrasonic cleaner too.

Anyway, most of the white gunk came off in the ultrasonic degreaser bath, and what was left mostly shifted with the help of some car screen wash, using an old electric toothbrush to scrub the surfaces clean. The really stubborn stuff require the use of a fiber glass pen.

Then out came the soldering iron...

Monday, 21 May 2012

CNS&M 454: Part 1


Again I found myself this weekend distracting myself by thinking about chipping another steeplecab, or two for that matter.

Number 457 is still in the shops being rebuilt (for definitions of rebuilt that include not doing much on it). So my model of number 453 was chosen, which I plan to modify to represent #454 when I get around to working on the hood sides to add the missing ventilation holes. Number 454 also had an interesting variation on how the window frames were painted, which is why I fancy turning #453 into #454. No two alike remember.

However, just because all the modification have yet to be done, it wasn't going to stop me from chipping her, and getting her on the road. So I started by taking the body shell off, and decided to remove the switch that allows one to go from track to overhead power; as after all I'm chipping this for DCC, and I don't think it is practical to use a switch to go between overhead and track power with DCC.

Then I thought I would look at the ride height, as I had noticed that the couplers were a bit low, and thought how hard would it be to fix this? So I disassembled the drive train and put some washers at the bolster, which brought the body up to the right height. Et VoilĂ  done.

However, and you knew there was a but coming along, as I start to reassemble the drive train I noticed that universal coupling shafts ends were freely rotating on the shafts. This is not good thing, and kind of explains why this steeplecab pulls so poorly. I started to work on fixing this problem and noticed that the angle of the drive shafts to the gear towers were quite extreme. I thought to myself why don't I replace the motor with something smaller? Again, how hard can it be?


So trusty puller to the rescue to remove the flywheel/come universal joints on the old motor.


New motor and I decided to use Ted Scannel's ideas from the CLAG website, using radio control aircraft fuel line, two small 3/32 ball bearings so as to extend the shaft lengths to match the new motor configuration.


All fitted, and here I'm making up a new motor retaining clip, using the old one cut in half with the plan that I'll solder the two halves back together in due course. I used my Kadee coupler trip pin pliers to adjust the circumference of the bands halves.


Here it is all hunky-bunky and ready to rock'n roll. Put it on the track and found I had an intermittent short. Poot! Back to the work bench...

On closer examination it was obvious that the ball joints were fouling the screw heads that kept the trucks in place. This is due to the fact that I have of course altered the ride height, but the gear towers remain the same height. Doh!

It was at this point that I regretted the fact that I had cut the original shafts in half, as after a bit of thought I realised that I could dispense with the original universal joints as supplied on the gear towers. Rather than spend time now making new shafts I stole the pair from engine #457 that is still in need of substantial cosmetic work.


And hey presto, just like that all done and dusted. Put the chassis on the track and she purred along like a sweet thing, rather than the old growl she use to have (I adjusted the skew of the motor you can see in the above picture before proceeding any further).


Next thing is to just run her around a bit, programme the chip using Decoder Pro, and then it will back to the bench for some cosmetic adjustment to get her to more closely resemble #454. After this

NB: Must get around to making some more poles. 

Sunday, 20 May 2012

100 Posts Already

Teaser picture for following posts....
Well doggone it's not that 100 is a particularly significant number per se, but still 100 posts in eight months is not bad going, for this type of blog. So where am I today? As I'm writing this, you are reading it in my future, and my past, so the answer as to where I am is relative to time & space.

Anyhow, the layout progresses. I find myself thinking about doing one thing and end up doing something else. For instance I keep switching between doing freight cars, see my accidental weathering comment last time, to working on the track. In this case I've painted the track with rail rust using a Floquil pen device, and then dry-brushed all the sleepers.

So it is all starting to look good. My partner said that the layout was starting to look like the tracks down at our local station, which I think is just right.

I'm also looking at all the forlorn freight cars that are still awaiting wheels, and I have had a few new cars arrive in the post, which I've not taken out of their boxes because they would just be sitting around gathering dust while I wait of my back order of the rest of the wheels I need.

It all feels like Waiting for Godot.

My mood being driven by work stresses, which appear to be taking a turn for the worse, so motivation come from the pleasure I take from the things I do, and ultimately isn't that what any hobby is all about?

Wednesday, 25 April 2012

CNS&M 420: Converted Observation


I got this a while back off eBay, and just hadn't gotten around to photographing it. It is awaiting the parts from Bill so that the power bogie can be replaced with a new design that will allow the car to have a full interior.

I also think that the poles are a bit average, and will be replaced with one's from Bowser. By the time I have fixed a few loose parts I imagine she will also get a spray over. The decals are less than they could be, as the film is quite apparent when you look a the model close up.

I'll soon have to start thinking about the elevated section of the layout at this rate.

Edit: Corrected title as it was pointed out to me that this is not a converted diner car, but a converted observation trailer car. Either way, a cool looking car.

Friday, 24 February 2012

CNS&M 250: Jewett Built Combines


I rescued this model from eBay. It is a Suydam CNS&M combine car. The paint scheme is all kinds of wrong  for this post war scheme, while the number is just plain wrong. The more Eagle eyed of you will note that this model sits too high on its bogies. In fact all the Suydam North Shore cars do. The giveaway is that one could mount Kadee couplers on them and that they would be at about the right height to couple up to freight cars. The real cars couldn't do this as the coupler was lower, so when they were being transported from the builders they had to be jacked up to match standard railroad coupler height.

Anyways, the North Shore has seven combine cars numbered 250 to 256. Number 251 was rebuilt into a Silverliner car in 1953, while car #255 vacillated back and forth over years having its seats removed so that it could carry extra baggage on trains transporting sailors to the USN base, to having them reinstalled during WW2, only to for them removed again after the war.

The other four cars had their baggage area extended by removing seats, not two alike it seem, again for accommodating sailors baggage, while #256 remained as built.

So the plan is to put her into the stripper, rebuild the drive using parts I've commissioned from Mousa Models, which will lower all the cars to the correct height, and then repaint her as #256 in the post war red and green scheme.

Tuesday, 14 February 2012

Golden Oldie


Got this of eBay and thought it might be useful for digitising the sound for a sound chip, maybe? Anyway, listened to the recording tonight on the deck and it sounded pretty good. Geek or what?
  

Wednesday, 18 January 2012

CNS&M: Locomotive Sizes

Some people have asked how large is the Alligator locomotive #459?  So I thought some pictures of her with two of her sisters for comparison might be appreciated.

So let's start with the smallest steeple cab first, #450.


And now with  steeple cab #453.


And finally with a PS-1 boxcar.


She looks a bit of a beast, but in fact she is quite dainty in her own way.

Monday, 16 January 2012

CNS&M 457: Build Part 2

Well I put her back into the soldering shop, and as you can see she looked liked she had been through the wars afterwards. If I didn't know that this is all cosmetic stuff that is very easy to clean up, I think I would have been quite disheartened.


Just showing the front and how getting the hood cover down tight straightened the whole appearance up.


The inside of the model in the soldering aftermath. To the right hand side and center my appallingly lumpy solder, and on the left the craftsmen lumpy solder. Solder will go lumpy, I just had more lumpy solder after re-soldering the model back together again.


Then after cleaning (a combination of scraping with a knife edge and  polishing with a fibre glass brush) you end up with a gleaming model like this.


Unfortunately, all the soldering had softened the brass wire of the hand rails, which had the tendency to bend if you looked at them a bit hard.

So I gently tweezed them straight and them used my micro torch to heat the the hand rails up and then quenched them with cold water, which restored their stiffness.

Finally, I reassembled her, breathing a sigh of relief that the connecting plates that had come adrift had been put back into the right place. Real skill, craftsmanship, or just plain stupid good luck? No not really, the model has oval holes in the frame so as to allow for any minor misalignments. Clever design by the original builders.


So by removing a few part I have completely changed the character of the locomotive and she looks a lot more like her sisters now. More to come when I move into the detailing stage.

Friday, 13 January 2012

CNS&M 457: Build Part 1

I'm currently off work with laryngitis. No seriously, my work made me take the time off sick as they felt I couldn't do my job properly. So feeling a bit miserable, as I much prefer to be working rather than sitting at home when unwell, I picked up my soldering iron and waved it all over my brass MTS Imports Sacramento & Northern GE steeple cab. Bought for me as a birthday present many years ago by my partner.

Oh dear the horror...

My soldering iron really doesn't have enough thermal capacity to handle the job, so I had to pre-heat the areas I was working on with a miniature brazing torch. Unfortunately, as a result the roof fell off as I was working on it. Oops! And as can also be seen the hood and the retaining plate too. You can't see it here but the other retaining plate also lost alignment too.


No matter though as it can be soldered back on. I discovered that it was handed in the process. By handed I mean that it fit better one way round and not the other. Things that look quite precisely made are often not as precise as one would thing. However, this is a sign that the model was a craftsman build, rather than machine built.


Various other bits fell off too. Including one of the hood covers and both the fixing plates to attach the body to the chassis.


Reassembled and looking like it has gone through the wars at this point. I took the opportunity to realigned the window frames to match the #457.


And here she is after a clean up with methylated spirits, a dip in the sonic cleaner and some going over with a fibre glass brush.


Big oops on the hood soldering now readily apparent as a gap has appeared. Oh well this is only stage one; she had go back into the soldering shop as two of the seams on the other hood that join it to the cab have broken.

Wednesday, 11 January 2012

CNS&M: 452, 453, 454 & 457

The four North Shore Line General Electric freight motors were arguably the core locomotive team for the railroads freight service. The first three were all acquired at the same time, while #457 was a second hand bargain.

I recently acquired from a dealer a Car Works #452 steeple cabs and an MTS Imports #453, both made in brass.


They are pretty much identical, but not quite. Some of this being down to replicating the minor variations between the sister locomotives, and some of it down to the manufacturers implementation of the prototype.


As and when I paint #453, it will be altered to represent #454, as it had an interesting variation on how the cab windows were painted.

I was a little surprised to see on the MTS box that they did three variants; locomotives #452, 453 & 457. This I found odd as according to the drawings I have, locomotive #457 was slightly longer than the original trio. Only six inches, or so, but still six inches can make quite a big difference in the bigger scheme of things.

The next model is  from the days when I was planning to build a layout of the Petaluma & Santa Rosa Railroad, and it is an MTS model of a Sacramento and Northern GE steeple cab. My intention is to convert this into a model of locomotive #457, as it shares the longer truck center spacing. I see it as a nice little ongoing project for when I feel like doing some soldering.


Here are the three steeple cabs together showing some of the detail differences between them.  I will also have to fabricate, or find replacement castings for the truck for #457.


This last shot pretty much replicates the common picture taken of three "pups" working together.


I will post updates. After all, I still have trolley poles to make for these first.
 

Monday, 9 January 2012

Improving Trolley Poles: Part 1

As you have probably all gathered by now my intention is to model an electric freight line inspired by the North Shore Line. This inspiration came from reading a couple of books. The first, Not Only Passengers: How the Electric Railways Carried Freight, Express and Baggage by Roy G. Benedict and James R. McFarlane, published by the Central Electric Railfans' Association, as Bulletin 129. The second, North Shore Line Interurban Freight by Edward M. DeRouin, by Pixel Publishing as part of Midwestern Rail Series Number Two.

As a result I want to run freight motors, and the North Shore had a few unique freight motors, which make nice signature locomotives for my layout. However, the North Shore freight train crews also had the habit of running with both poles up; done I understand to reduce the strain on the overhead when drawing large amounts of power when starting heavy freight trains. They also had the habit of swinging both poles to hang over the same end of their four GE freight motors #452, 453, 454 & 457.

This causes a problem when trying to replicate this on the models. So the first picture show a CNS&M Steeple Cab Imported by MTS Imports, Inc. I've replace the MTS poles with Eatman Custom Engineering poles I got off eBay. These are effectively a modern version of the Suydam poles, with better wheels/sliders.


 As you can see when down there is plenty of room between the two poles when down.


The second picture show a CNS&M Steeple Cab Imported by The Car Works with MTS poles showing that they too can be run with twin poles collecting current.


However, when down these poles foul each other as can be seen here. Not so good.


They also foul each other when both up facing in opposite directions. An unlikely situation, but I show it just the same.


Here is an over head view showing the biggest problem of all, which is that one can't stow both the the poles down on one end, a typical North Shore Line practice by the train crews of the freight locomotives.


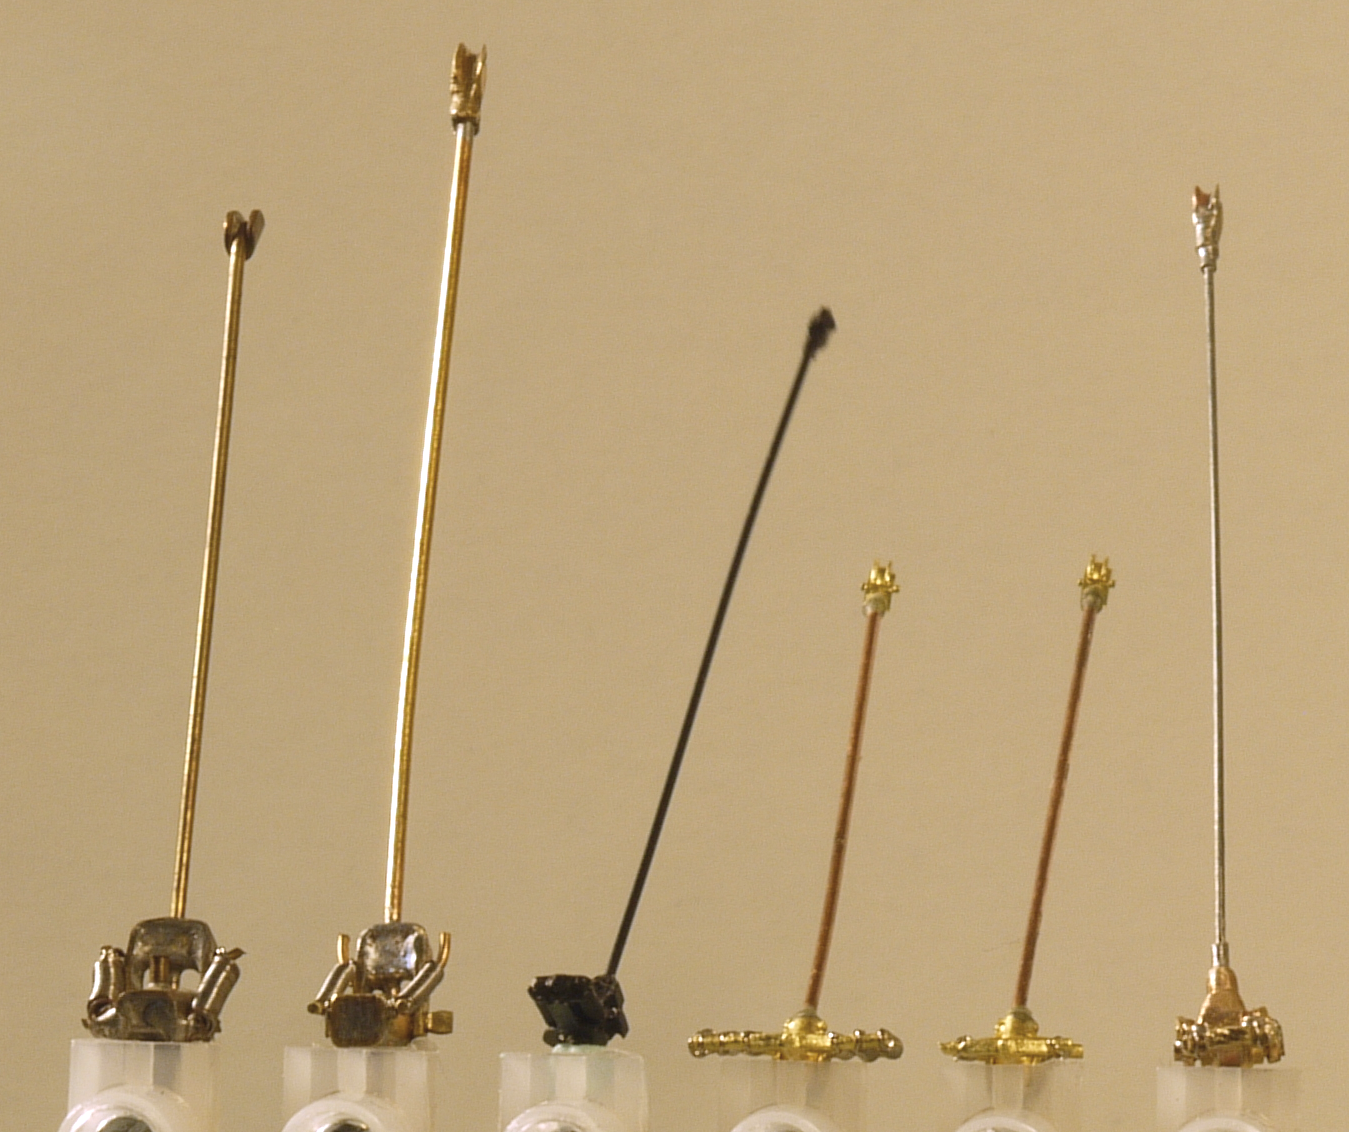
The poles I have to hand are  as follows from left to right; a Suydam original, an Eatman Custom Engineering pole, a Car Works pole, two MTS poles (one modified to two springs), and finally a PSC pole that I have modified by shortening it and replacing the pole with a scale thickness guitar wire.


Order reversed for the top view.


Both of the modified poles to the left of the picture are still too wide to do the whole both poles pulled down on one end thing that the North Shore Line freight train crews did. The rather lovely Car Works poll suffers from being too long, which prevents the prototypical functioning I require, and for those of an inclination to such matters, still scales at about twice the length of the prototype..

Plan at this point is to go back and rebuild the PSC kit again. I've already cut it in half to shorten it, but I reckon I can take another couple of millimetres off its length, and more importantly I plan to narrow the width of the end. Hopefully, this will allow two poles to be pulled down on one end.

Oh yes. Made my replacement pole too long, forgot I was working in 3.5mm to the foot, not 4mm. Oops.
  
Edited Jan 10th for clarification.